
Dragon - Haku from Spirited Away
Size: Big
Pattern Slightly modified from: here
Where you will find a beautiful, much more professional looking Haku than mine :D
Finished just before Halloween, 10/31/2013
This was an absolutely wonderful project, but I will not be doing something like it again soon. This was my third completed crochet animal [amigurumi], my first time using wire, my first time using safety eyes [which I failed at miserably since I didn't put them in as I was making it, so I ended up just super gluing them in (in my defense, I didn't have them until the dragon was done, so it was only half poor planning and half thoughtlessness/overconfidence)], and my first time in general making anything this big and this complicated. He was 100% worth it though. Actually crocheting him and putting him together was surprisingly easy [besides for some wire confusion]. The hardest part by far was the blue/green mane which was ridiculously time consuming [probably because I made it way too thick]. And a major setback towards the end was when his whiskers were made of too thick of wire and would not stay on his face properly so I had to improvise a whisker-holder on his face. Anyways, here's his short story:
The story of Haku:
So, I decided to make my friend something really cool for her birthday: not just any dragon, but Haku from Spirited Away. I found this amazing pattern by aphid777 on deviantart entitled Small-ish Haku. Little did I know that small-ish meant huge, so soon I was in way over my head. After a couple days of crocheting, it was my friend's birthday and all I had to show for it was a long, snake-like white body and the promise that I would turn it into something really cool for her belated birthday present. Fast-forward three months and Haku's body was chilling in my dorm closet, still just as incomplete, college being quite the distraction. I remembered my promise to my friend that I would have him done by Halloween, but suddenly Halloween was only a week and a half away. So I got out all of my too-long-untouched crocheting supplies and began working. The more I worked, the more awesome he looked, so I kept working. Finally, after about a week, he was done, so I packaged him up and sent him off to the magical city of Chicago where he made a belated birthday to remember! - the day after Halloween [almost kept my promise! - So close!!!]. And that is the wonderful story of Mr. Haku the Dragon
I had a bunch of fun and really fell in love with this dragon, but I think I will keep my upcoming projects to a much smaller size, and I prefer to stay away from wire. Below there is a really in depth picture journey of Haku's creation, so enjoy!
Work in Progress:
WARNING: There are a lot of pictures, starting with the most unfinished to finished, so if you want to see the cool dragon pictures scroll more towards the bottom.
So... This was the largest [besides for a blanket I did once], most complicated thing I have ever crocheted, thus a lot of pictures are a necessity!!!
This is the early days of the dragon back in July working on his body. This was when I started to realize just how big he was going to be!

This was when I added the wire to the body. From here on out I had to crochet the thing standing up with the wire poking me in the face. I literally was walking around my house with a big trail of yarn while dodging the giant wire and crocheting meanwhile making sure my puppy didn't go after my yarn. It was intense ^ ^

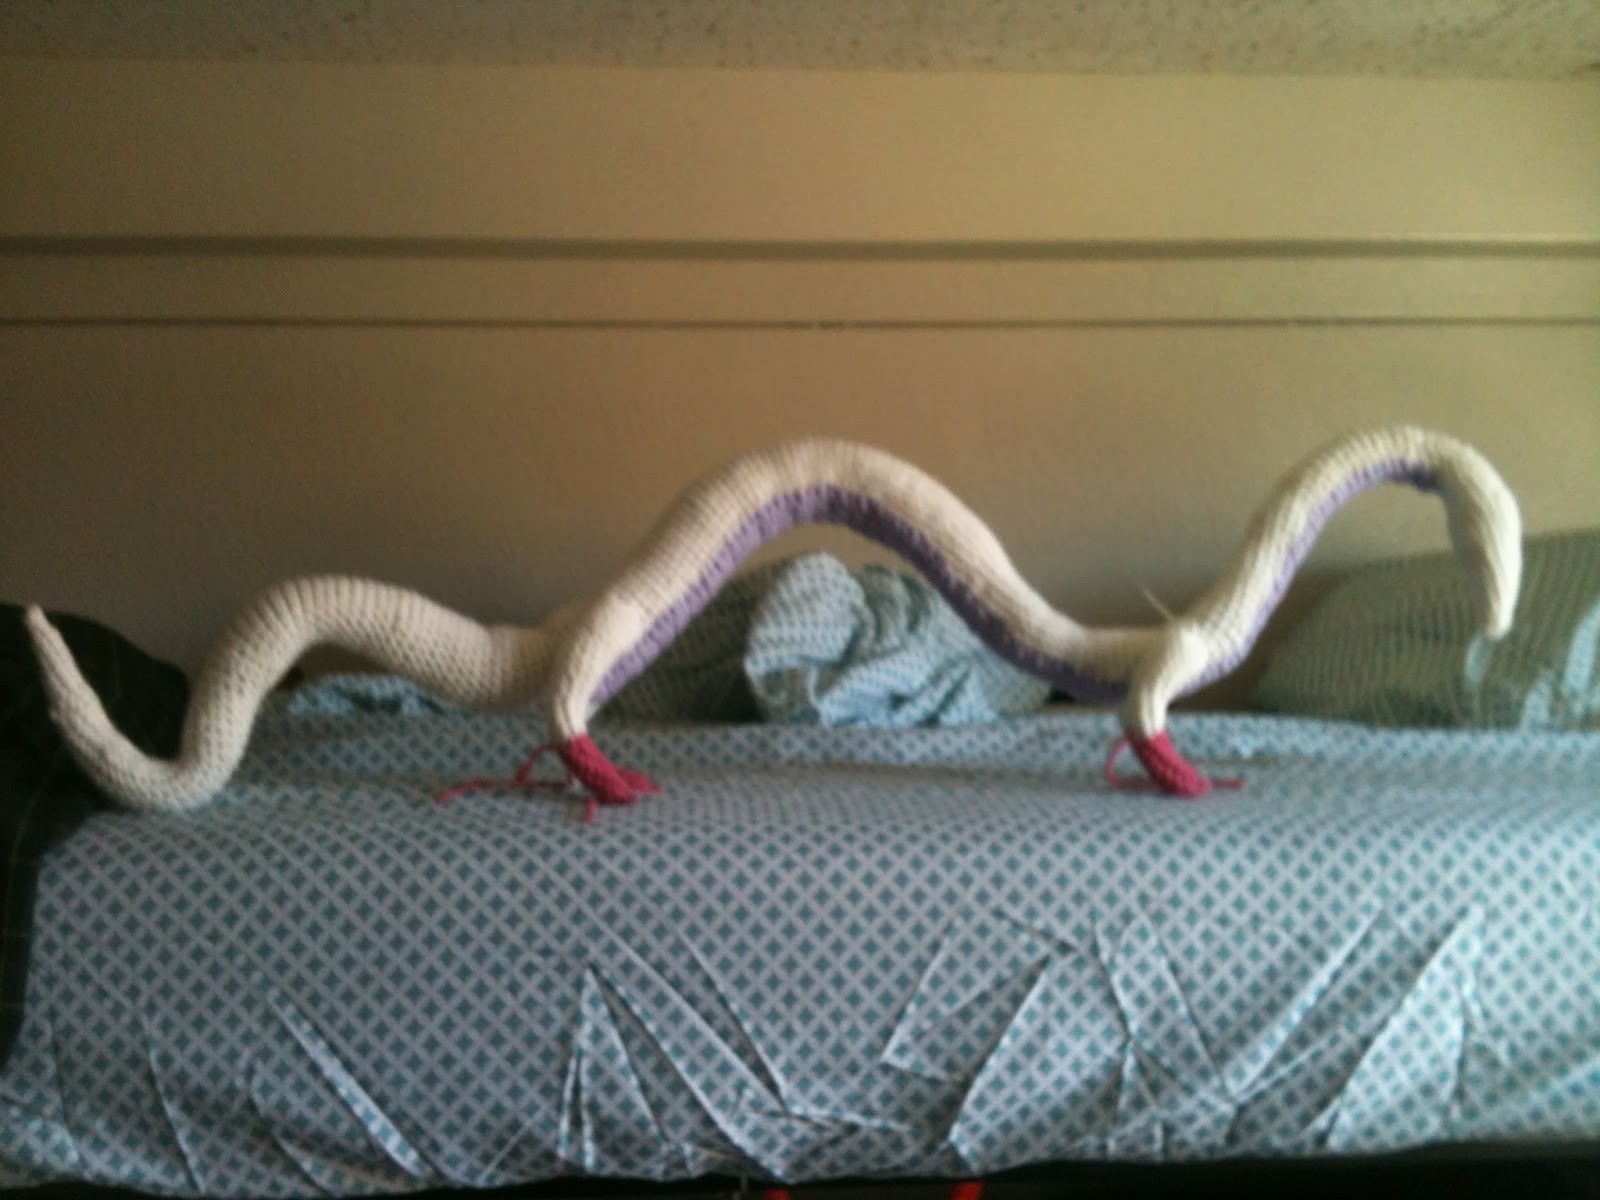
This is the completed body. Even all curvy it was still longer than my bed is wide! This was as much as I got done in July since I worked on the legs, but I was unhappy with the color pink that I had so I abandoned my half-finished legs.

Finally, months later he has legs!!! I commenced work in October with my acceptable color of pink yarn and began giving this guy legs. You can also see that I stitched in his purple belly that I had made back in June.

These back legs weren't even stitched on yet, but I was so excited that he was going to be able to stand...

Front and back legs on!!! He can stand all on his own and even hold up his own tail!

Lengthwise view of dragon thus far.
And so begins the long process of latch-hooking on his hair with a crochet hook [not a latch hook which would have been much easier but still would have taken forever].

A huge time jump later and he has all of his hair!!! Notice his hair isn't super soft and fuzzy because I didn't have a wire brush to really brush it out so I was just using my hair brush which did a poor job separating the strands of yarn and made his hair more wavy than fuzzy. [Not to mention that most of the yarn I ended up separating by hand because my hair brush was not working well enough D: - crocheting the dragon was the easy part - the hair by far was the hardest single thing I have ever done with yarn in my life]

Yay! Another lengthwise view of the dragon. Notice the excess yarn/hair pileup by his front legs. I didn't really think it though that he would need a lot less hair when his body was curving inwards... That could have saved me a lot of work... Isn't he beautiful though! I would leave him standing up on my bed while I went to classes, and usually he'd still be standing up there when I got back! Sturdy little dragon :D

Closeup on the wavy haired dragon.

Hanging dragon! Isn't he a cutie?

Just chilling up on my bed.

Look he has eyes! And horns!!! I used brown animal safety eyes from Joann Fabrics. The horns are wire wrapped with yarn. I used a little bit of superglue just to ensure that the horns didn't unwrap. Also, you can't exactly put safety eyes on a crochet animal after it is already made so I cheated and superglued them in. I would've been able to fit the washers through the stitches if I hadn't used such big safety eyes [12 mm].

Lengthwise view of the little guy with his eyes and horns.

Such a cutie! [sorry there's so many pictures, but I couldn't help it!]

Whiskers!!!

The whiskers were sure a pain because I only had super thick wire so it was dragging his whole head down and the whiskers would flip upside down. I had to create a little whisker brace going through his face in order to keep them up. This was super poor planning on my part, but it ended up working out okay.

Lengthwise view of dragon with whiskers. Note on his hair: I ended up extending his hairline a little bit bast the third bump [the bump after his hind legs] but I never took a picture of the minor hair extension. Just a note though.

Now that Mr. Dragon is complete, time to take a couple last pictures and then pack him up :(

Notice I added some black felt lashes around his eyes to make them more anime-like.

Dragon looking out window <3

Again, dragon looking out window <3

Dragon all packed up </3


Note: I ended up using a bigger box at the post office for no extra cost, but I had to squeeze him in this box just in case. Hard to believe such a big animal could fit in such a little box. My roommate didn't think I could do it, but I made it happen - though he looks pretty uncomfortable </3

Aftermath of the dragon:

Couldn't brush my hair for a couple weeks afterwards until I finally cleaned my brushes [just wore my hair in a messy bun every day].

Big fuzz ball of blue yarn I have to figure out something to do with...

I will miss seeing Mr. Dragon perched on my loft whenever I get back from my classes but I have spent my time with him and now he is in an even better [and more exciting] place!
Mr. Dragon has reached his forever home as a [very belated] birthday [Halloween] gift to a wonderful friend of mine :D And he lived happily ever after <3 <3 <3 [Who said dragons couldn't live happily ever after anyways? :D ]
~Now on to the next project!
That is so adorable!
ReplyDeleteThanks! :)
DeleteThis crochet is really cute :). I'm about to make my own and this is going to be my first time crocheting with wire as well. Do you have any tips on how I could crochet around wire for the bodg? It seems wide enough that I would probably need to make a frame or something :(.
ReplyDeleteHi! Good luck! Sorry if this reply is much too late: I think I had quite a bit of the body crocheted and stuffed before I added the wire (maybe like a foot and a half or two feet). Then I would just crochet around with the big piece of wire sticking out (but I was using much thicker wire than I had to. You can probably keep it curled up at the top of the body and unravel it as you go if you don't want to risk poking your eye out with a huge piece of wire sticking out). I remember it being particularly easy to crochet while walking around my house (since the body was so long) but you could probably curl up the body and wire to make it more comfortable to crochet sitting too. Sorry I don't have any more tips than this - Good luck! Let me know how it goes!
DeleteWhat gauge wire do you recommend using?
ReplyDeleteCan you add the link that will take me right to the patteren please. I have been trying to find it and can't. My fiance's birthday is the 6th of next month and I want to make him one cause he fell in love with it but I can't find the patteren to do so. Please help me out.
ReplyDeleteCan you post the direct link to the pattern cause the one above don't have the pattern and my fiance's birthday is coming up in April and I would love to make him one since he went crazy when he saw it.
ReplyDeleteHi! The pattern I used was just the rough one in the description on the deviantart page: http://aphid777.deviantart.com/art/Small-ish-Haku-372325877
DeleteGood luck!
Hi! Great job! I'm following the original pattern and am stuck on how to attach the legs. Do you sew up the top first and then sew the top to the body or do you attach the side around the wire? Thanks!
ReplyDeleteHi! I had a single piece of wire going through one leg through the body, and then through the other leg so I stitched around the wire connecting the leg all the way around to the body meanwhile closing the top of the leg at the same time (if that makes sense). You can see in my pictures above in the first pictures where he is standing the legs are not yet sewed on but just have the wire inserted through them. Then I stitched the top closed, connecting them to the body, and continued to stitch around the wire so that they were on securely. Hope this makes sense and good luck!
DeleteThanks, that does make sense! My legs are a bit wobbly so I may detach them and do it again your way once I've finished the mane.
ReplyDeleteAwesome! Sounds like you're almost done! - Good luck!
Deleteplease send me the pattern? cannot find it!
ReplyDeleteHope you found it okay - sorry for the late reply - it's here: https://www.deviantart.com/aphid777/art/Small-ish-Haku-372325877
DeleteDid you do spiral crochet after the magic ring for the whole body. Aphid said something about using one and saying her rounds are in the center of his belly. Not sure what she means by that and did you happen to put wire in the face as well?
ReplyDeleteyes i think so - the whole body is made in a giant tube. maybe she just means for counting purposes? idk also not sure. and yes I have wire throughout the entire body from the tip of the tail to the nose
DeleteI did do spiral but sounds like Aphid did rounds which would leave a kind of line where the rounds are connected.
ReplyDeleteOkay that makes sense. Someone followed the pattern exactly and I looked at it. Turned out nice. I got magic ring down but im confused on the second row. Does she mean to single crochet in stitch from the round then increase after that or does she mean do the single crochet separate and then increase in thr stitch of thr round ? -Sc, inc, sc 2, inc, sc (8)
ReplyDeleteI just wish there were more photos of each step. I know how to read patterns but it's been awhile since I crochet. I'm a fast learner so it shouldn't take me a while to get a hang of it but I'm a visual learner
DeleteYou start with a single crochet, then increase in the next one, then 2 more sc , increase in the next one and then and with a sc
DeleteOkay thanks. I had a few more questions if you don't mind? Sc about 6 more to get back to the midline of the underbelly: How do i do this? Same goes for: Sc about 1 to get back to midline.
DeleteSc around 3 times (12): I get this
The wire exits in this row: What does this mean and how do i continue the next step from here? which is:
Sc around 2 times (12)
FO
it's just saying to do a couple extra single crochet stitches until you're back on the belly line i think - just normal sc - 'the wire exits' assumes you are crocheting around a wire with the wire in the middle so it's probably just saying that's the part where you poke the wire out and continue crocheting but tbh i don't remember this part
Delete