Pages

Saturday, May 30, 2015

Other Art 7: Harry Potter Mug

Harry Potter Mug
Time: A couple hours
Materials: A glass mug, Americana Crystal Gloss Enamels glass paint (black and white), 
a sharpie, an oven

I am a huge Harry Potter fan so I was really excited to make this mug. This was a super fun project that I made for one of my friends for her birthday. It was quick and easy, and the best part is that the mug is completely usable and dishwasher safe!

I formed the idea when I was looking online for things to make or get for my friend for her birthday so I was looking at Harry Potter and The Lord of the Rings trinkets when I came across a couple different really cool Harry Potter mugs that people had made and I thought, "I could totally do that!" However making mugs is a bit tricky especially if you want to be able to use them! The safest bet as far as I can tell is to buy specific ceramic or glass paint that says it is dishwasher safe after you bake it in the oven. Unfortunately I have yet to find such a paint that also says it is safe to use on the food/drink side of the surface, and I really wanted to stipple a grim on the bottom of the cup which is why I ended up going for a glass cup rather than a ceramic one.

Though I messed up in a couple parts because I was getting used to using the paints, I am overall really happy with this mug (and I hope my friend enjoys it as well! :D ) and I am definitely going to make more mugs or similar things in the future!!! (Already bought four more colors of the Americana Crystal Gloss Enamels paints!!!) [Even though making mugs is a little too close to the 'crafty' realm rather than the 'artsy' realm for my comfort sometimes since I really am not particularly 'crafty'...]

Anyways, here's a super detailed look at how I made the mug!!!

Original sketch for the mug. I was literally going to write our 'Harry Potter' in Harry Potter font which would've been kind of a pain so I'm really glad I didn't do that!

I was originally planning on putting this on the handle (depending on how big the handle of the mug I was going to buy was) but instead I decided to write my friend's name on the handle to make it more personalized.

Looking at pictures on the internet, I sketched out a silhouette of the Hogwarts castle on a strip of paper that would reach half-way around the cup so I could draw the castle twice. Then I taped the paper down to the cup so I could trace the drawing.

This is what the inside looks like with the paper taped on. Notice I had to trace the outline of the castle to the other side of the paper so I could see it better. I am actually tracing the castle backwards so that it will be forwards on the outside.

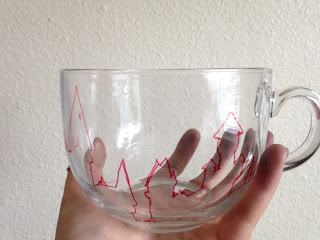
Here's after I traced it. I used a red sharpie so that it would be easier to see when using black paint. Note: the glass warps the drawing quite a bit so it's important to make sure what you're tracing still looks good even if it doesn't exactly match the original sketch.

Here's the first castle completely traced.

Here it is with both castles and a sketch of the grim on the bottom. Note: All of the sharpie is on the inside of the glass so that you can see it when you paint on the outside of the glass (since you can't paint on the inside of the glass at all since the paint isn't supposed to be in contact with food or drink).

These were my sketches for the symbols I wanted going around the cup. I wanted 8 symbols: the seven horcruxes (Book, Ring, Locket, Cup, Diadem, Snake, Harry), and the Deathly Hallows symbol.

Here's everything fully painted. Notice I am wearing gloves because if any oil gets on the outside of the cup underneath the paint then all of the paint will chip off. You have to wipe the whole thing down with rubbing alcohol before you start painting.


Sirius!!! <3 (but jk, it's the actual grim)

The cup has to dry for like four days before you bake it. I had to keep it upside down since there was paint on the bottom. Notice I also wiped off the sharpie from the inside using rubbing alcohol.

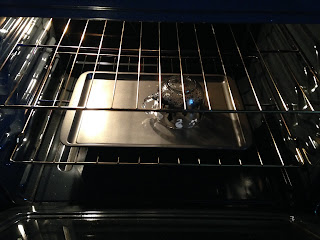
After 4 days you bake it at 275 degrees Fahrenheit for 30 minutes.


And it's done!!! :D


Sunday, May 17, 2015

Other Art 6: Fruit Mug

Fruit Mug
Created at 'All Fired Up' - a pot painting place
April 2015

I made this mug for my mom for mother's day. I wanted to incorporate some fruit (since our kitchen has a lot of fruit pictures and things), and the bordering that is on our china (Mikasa Italian countryside). I had a bunch of fun planning and making this (so there are a lot of pictures...).

Note: I had to do a lot of planning since I would have less than two hours to choose a mug, draw, and paint everything! (And after choosing my mug I ended up having only around an hour to do everything but I got it all done!!!)

Enjoy!

Planning the fruit layout and thinking about how I am going to paint them. Using glazes at the pottery place is totally different from painting with acrylics. I had only done this once before (with the Dragon Bowl), so I still didn't quite understand how to use the glazes.

Originally I was going to make a plate.

 And then I wanted to make another bowl. Notice I wanted the inside to be rings of colors which I ended up adapting to the mug.

Finally I was able to convert my design into a mug. The fancy border is adapted from the Mikasa Italian countryside china.

 I made a layout of my design and tried to figure out my colors.

 This is the border color scheme I ended up choosing, but I wish I would've went with a darker green in the stripes, but I wasn't sure how the yellow would look over a darker green since I wasn't sure how the glazes would act.

 Before being fired up!
 I tried to add a border around the lemon last minute so it didn't fade into the border.

 Note: the names around the rim are my families (since it's a mother's day mug but I didn't exactly want to write 'Happy Mother's day' - I just wanted to make it cute and something my mom would like) [though in retrospect I wish I would've at least written happy mother's day on the bottom]


Frankie is my puppy.

Inside.

Final mug! Note: since I was rushing I only did two layers of glaze instead of the recommended three so my mug was a bit blotchier than I expected it to be but I'm still quite happy with it. Also note the shadows on the orange needed to be much darker but I couldn't anticipate how layering the glazes would look... 


The handle for some reason turned out really nice even though I definitely only put two layers of glaze...

The inside was pretty blotchy but you can't really tell in the picture. But that part doesn't matter as much as the outside at least.

Overall this was a super fun project, and it makes me want to paint more mugs and bowls and things!!! I had a blast and I hope my mom is enjoying her mug! Happy Mother's Day!!! :D

Other Art 5: Dragon Bowl


Dragon Bowl
Created at 'All Fired Up' - a pot painting place
November 2013

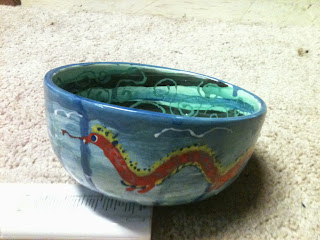
I made this a while ago at a pottery event with my floor at my dorm. I wanted to make a bowl and (inspired by recently completing the Haku dragon crochet) I decided to put a bunch of dragons on it. I wanted it to be like the (wingless) dragons were flying in the sky (the white lines were supposed to be cloud lines...), and I wanted the inside of the bowl to be a cool jade green color and really swirly (although I went a bit over-swirly putting swirls on top of swirls on top of swirls).

This was a super fun project to make, and I definitely want to do more with ceramics and glassware in the future (hint hint nudge nudge).

Side note: My mom always uses this bowl now! (And by always I mean sometimes but more than I thought it would be used). It makes things extra special. :) It's an especially good strawberry bowl. :D

Way too many pictures:


Cute dragon:


Inside: [super swirls]
I think I probably should've just left it with just the big multi-swirls and not gone over it with all of the little swirls that just make it look messy and take away from the big mega-swirl.

 Another cute dragon.

 Bowl


Bottom: 

That's all!

Monday, May 4, 2015

Crochet Pattern 2: Mini Kuriboh Amigurumi

Mini Kuriboh Amigurumi Pattern

Size: 9ish inches high
Time: A bit (most of the time is in the fur)
Basic Sphere Pattern: Crochet Spheres (Note: following pattern is based off of 26 Row Sphere but can be adjusted for different sizes)

Materials:


3 colors of 4 ply acrylic yarn (Pictured Brown, Green, and Light Yellow) 
Crochet hook
Yarn needle
Stuffing (acrylic or other)

Crafting felt and Super glue (for eyes) [or alternately can use clay, plastic, embroidered or needle felted eyes]

Abbreviations: 

ch - chain
sc - single crochet
inc - increase
sc2tog - single crochet two together (decrease)
sc3tog - single crochet three together (extra decrease)
st - stitch
(#) - signifies total number of stitches facing up around the loop by the end of the row

Body: Using Brown (begin stuffing as you start decreasing)

1- ch 2. 6 sc in second ch from hook. (6)
2- inc in each stitch around. (12)
3- (1 sc, inc) repeat 6 times (18)
4- 1 sc, inc, 2 sc, inc, 3 sc, inc, 2 sc, inc, 3 sc, inc, 2 sc (23)
5- 2 sc, inc, 3 sc, inc, 4 sc, inc, 3 sc, inc, 4 sc, inc, 2 sc (28)
6- 1 sc, inc, 4 sc, inc, 5 sc, inc, 4 sc, inc, 5 sc, inc, 4 sc (33)
7- 3 sc, inc, 5 sc, inc, 6 sc, inc, 5 sc, inc, 6 sc, inc, 3 sc (38)
8- 8 sc, inc, 9 sc, inc, 8 sc, inc, 9 sc, inc (42)
9- 6 sc, inc, 13 sc, inc, 13 sc, inc, 7 sc (45)
10- 9 sc, inc, 14 sc, inc, 14 sc, inc, 5 sc (48)
11- 15 sc, inc, 23 sc, inc, 8 sc (50)
12- 24 sc, inc, 25 sc (51)
13- inc, 50 sc (52)
14- sc in each st around (52)
15- 50 sc, sc2tog (51)
16- 25 sc, sc2tog, 24 sc (50)
17- 8 sc, sc2tog, 23 sc, sc2tog, 15 sc (48)
18- 5 sc, sc2tog, 14 sc, sc2tog, 14 sc, sc2tog, 9 sc (45)
19- 7 sc, sc2tog, 13 sc, sc2tog, 13 sc, sc2tog, 6 sc (42)
20- sc2tog, 9 sc, sc2tog, 8 sc, sc2tog, 9 sc, sc2tog, 8 sc (38)
21- 3 sc, sc2tog, 6 sc, sc2tog, 5 sc, sc2tog, 6 sc, sc2tog, 5 sc, sc2tog, 3 sc (33)
22- 4 sc, sc2tog, 5 sc, sc2tog, 4 sc, sc2tog, 5 sc, sc2tog, 4 sc, sc2tog, 1 sc (28)
23- 2 sc, sc2tog, 4 sc, sc2tog, 3 sc, sc2tog, 4 sc, sc2tog, 3 sc, sc2tog, 2 sc (23)
24- 2 sc, sc2tog, 3 sc, sc2tog, 2 sc, sc2tog, 3 sc, sc2tog, 2 sc, sc2tog, 1 sc (18)
25- (sc2tog, 1 sc) repeat 6 times (12)
26- 4 sc3tog. Fasten off. Weave loose end through each stitch in the opening and pull tightly to close.


(What the body should look like minus the couple of hairs at the top)


Limbs (x4): Using Green

1- Ch 6, sl first chain (6)
2- Sc around (6)
3- Again (6)
4- Sc, inc, 2sc inc sc (8)
5 - Sc inc inc 2sc inc inc sc (12)
6 - 2sc inc inc 4sc inc inc 2sc (16)
7 - Sc around (16)
8 - Again (16)
9 - Again (16)
10 - Slip 3, cast off


(What one limb looks like)

Making claws: Using Yellow Yarn


Mentally separate top of foot into three sections of 5-6-5 stitches

Start at left section, then do middle, then right

Left and right sections:
1- Sc in each st around (5)
2- sc2tog, sc2tog, sc (3)
3- sc2tog, sc (2)
4- sc2tog (1)
5- ch, cast off

Middle section:
1- Sc in each st around (6)
2- sc2tog, sc2tog, sc2tog (3)
3- sc2tog, sc (2)
4- sc2tog (1)
5- ch, cast off

Attaching limbs, eyes: (Ignore the hair that was already started in these pictures - fur will be explained more below)


I cut my eyes out of felt and both super-glued and sewed them on (with regular needle and thread).

Using yarn needle attach limbs, two on sides slightly to the front and two on bottom with the toes sticking out. Remember the fur will cover a lot of the limbs depending on how long you make it so make sure the toes are sticking out far enough.

Making him Fluffy:


 Start latch hooking yarn (using either latch hook or crochet hook and fingers) from the top. When cutting all of your yarn up make sure you cut it all approximately the same length. I wrapped it around my same (I think three?) fingers a bunch of times and cut large bunches of yarn at once. It's okay to have some longer and shorter strands since they will all be separated or brushed out later and they can also be trimmed.
 Note: I latch-hooked pieces of yarn to every stitch but you can just as well do every other if you want less fur.
 Continue latch hooking around his eyes and limbs. Note, after you are finished, you probably want to trim the hairs around his eyes to be a little shorter so that his eyes don't get too covered up. Start separating the strands of yarn. I separated a lot of the strands by hand so that he didn't get too frizzy (although he would also look good frizzy if you used a wire brush), and later on I used my hair brush a bit to make him a little fluffier.
He's finished!!! :D